A ship CAD model can have 100’s of thousands of modeled parts without counting every nut, bolt and gasket or even any pipe under 1” ? . Knowing what a user has changed in the model can be very difficult without having a visual model. Being able to visually see the parts that have been created and/or modified to accomplish a specific task can be a huge time saver in determining what actually changed in your 100, 000+ ship model.
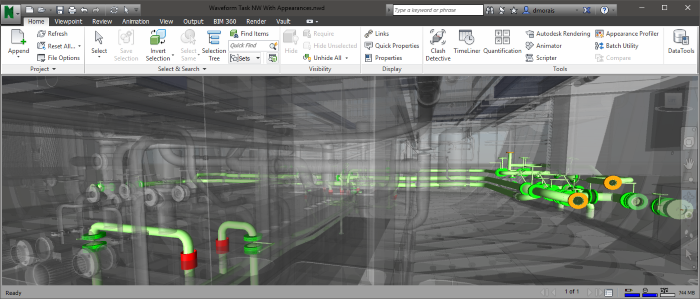
In this Tips & Tricks blog post I will show you how you can create an interactive 3D Navisworks model that will allow you to very easily and quickly see what a user has changed to accomplish a task. This Navisworks model will continue to be linked to ShipConstructor allowing you to select an item in Navisworks and switch to the ShipConstructor drawing to make more changes.
There is some setup (~10 -20 min) for each project to generate the output. However, once the project and user is set up it will take 1-5 min to create the Navisworks model.
Video
If you cannot view the YouTube video, click here to access it via SSI Nexus.
1. EnterprisePlatform Operations (One Time Setup < 3 min)
We will need to add one operation to your EnterprisePlatform operations.xml.
Option 1
Requirement for this option:
- This is the first modification made to EnterprisePlatform Operations.xml
- Are using ShipConstructor 2017 R1.1
Steps
- Copy Operations.xml file in zip package provide at the bottom of the blog post to C:\Users\USER NAME\AppData\Roaming\SSI\EnterprisePlatform 2017\Operations.xml
Option 2
- Open file C:\Users\USER NAME\AppData\Roaming\SSI\EnterprisePlatform 2017\Operations.xml with a text editor such as Notepad
- Between tag <generalgroupoperations> and </generalgroupoperations> copy below operation
<!--@@@@@@@@@@@@@@@@@@@@@@@@@@@@@@@@@@@@@@@@@@@@@@@@@@@@@@@-->
<!--Waveform NW Part Properties Excel -->
<!--This operation is only compatible with Microsoft Office in 2007 and up -->
<!--Part Properties for Modification Interferences in Navisworks-->
<!--@@@@@@@@@@@@@@@@@@@@@@@@@@@@@@@@@@@@@@@@@@@@@@@@@@@@@@@-->
<operation id="Waveform NW Part Properties Excel" appliesto="parts">
     <define name="operation.timeout">
     <invoke function="GetOperationTimeout">
          <property name="list.ids"/>
          <int>2</int>
          <property name="default.startup.timeout"/>
     </invoke>
     </define>

     <!-- Create Folder -->
     <define name="NWPartExcelFolder"><pathcombine><property name="rootdir"/><string>NWPartExcel</string></pathcombine></define>
     <makedir>${NWPartExcelFolder}</makedir>

     <!-- Copy NW Excel Template -->
     <define name="NWPartExcelTemplateFullName"><pathcombine><property name="projectdirectory"/><string>EnterprisePlatform</string><string>NW Part Excel</string><string>NW Part Excel Template.xlsx</string></pathcombine></define>
     <define name="NWPartExcel">NWPartExcel.xlsx</define>
     <define name="NWPartExcelFullname"><pathcombine><property name="NWPartExcelFolder" /><property name="NWPartExcel" /></pathcombine></define>

     <if>
          <test><fileexists>${NWPartExcelTemplateFullName}</fileexists></test>
          <iftrue>
               <copyfile sourcefile="${NWPartExcelTemplateFullName}" destinationfolder="${NWPartExcelFolder}" newfilename="${NWPartExcel}" overwrite="true"/>
               <log>copyfile sourcefile: "${NWPartExcelTemplateFullName}" destinationfolder:"${NWPartExcelFolder}" newfilename:"${NWPartExcel}"</log>
          </iftrue>
          <iffalse>
               <log>DID NOT COPY TEMPLATE copyfile sourcefile: "${NWPartExcelTemplateFullName}" destinationfolder:"${NWPartExcelFolder}" newfilename:"${NWPartExcel}"</log>
          </iffalse>
     </if>
     <scon timeoutinsec="${operation.timeout}">EPEXPORTPARTPROPERTIES ${list.ids} "EnterprisePlatform Parts" "" "{Primary}" "${rootdir}" "PartProperties.tsv"</scon>
     <excelimporttotable workbook="${NWPartExcelFullname}" sheetname="Source">${rootdir}\PartProperties.tsv</excelimporttotable>
     <deletefile>${rootdir}\PartProperties.tsv</deletefile>
     <associate inputitems="${list.ids}">${NWPartExcelFullname}</associate>
</operation>Note: Since we are using Navisworks, make sure you edit the operations.xml file to point to your version of Navisworks. You can do this by opening the Operations.xml in a text editor and editing this line:
<define name=”navisworks”>C:\Program Files\Autodesk\Navisworks Manage 2017\roamer</define>
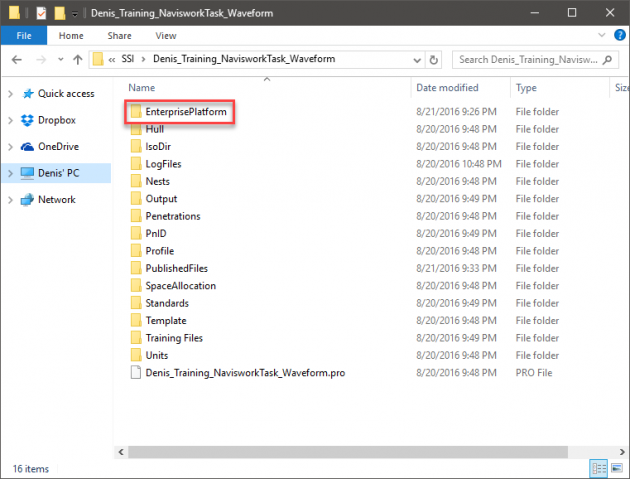
2. Copy Navisworks Template (One Time Setup < 1 min)
We will copy the Navisworks Excel template to the ShipConstructor project folder so you only need to do this once per project.
- Copy Folder EnterprisePlatform in the provided Package zip file to the root of your project. This is the same location as your .pro file.
3. Making Changes in ShipConstructor
To enable tracking of what a user creates/modifies to accomplish a task you will have to use ShipConstructor Tasks which is currently part of the Subscription Advantage package and will eventually be incorporated in the EnterprisePlatform portfolio. You can learn more about ShipConstructor Tasks by referring to the ShipConstructor manuals.
4. Running PublisherLT (3 min of effort)
One Time Setup
- Ensure Output path is set to the location you will want the output to.
- On the bottom right hand corner of the PublisherLT window, ensure the Create Date Folder is OFF
- This will eliminate any additional work relinking the output to Navisworks.

Load Items
- Click Load Manager
- Click Task Items
- Click Select Specific
- Select your Task
Choose Operations
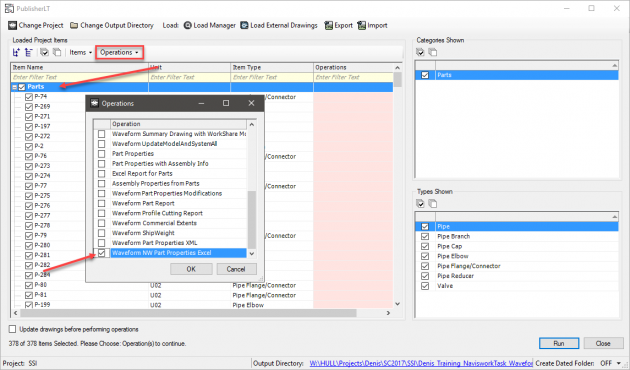
- Select Parts in main window
- Click Operations > Select
- Click check box Waveform NW Part Properties Excel
- If you are creating a Navisworks model as well, go to the next section, otherwise you can click Run.
Optional Create Navisworks Model
If you already have a Navisworks model you are using, you do not need to do this step. Otherwise, if you want to generate a new Navisworks model you can complete this step.
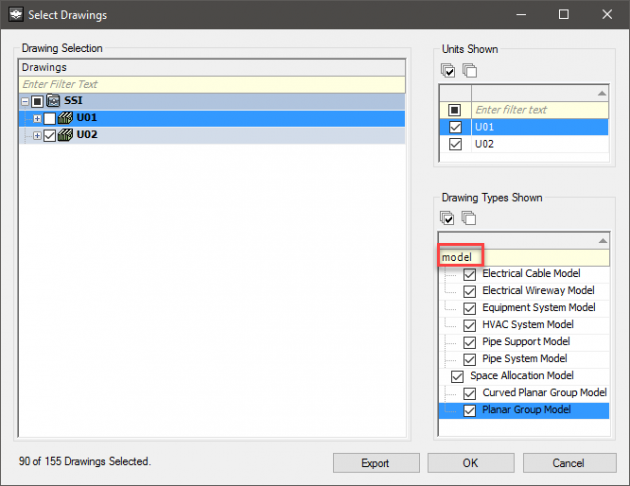
Load all drawing for your Navisworks file to see changed parts and reference parts.
- Click Load Manager
- Select Drawings
- Click Select Specific
- Select the drawings you want to include
- Best practice is to only load Model drawings which you can filter (shown in video)
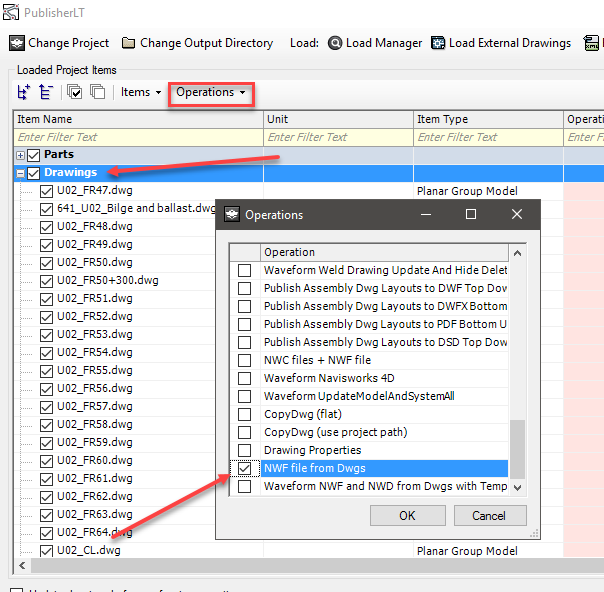
- Select Drawings in the Main window of PublisherLT
- Click Operations > Select
- Check NWF file from Dwgs
- Click Run
5. Import Navisworks Datatools (One Time Setup < 3min)
This onetime step is to create a link to the generated files from PublisherLT to Navisworks. As long as you always generate the files to the same location this only needs to be done once. If you change the location, you will need to change the file path on the Datatools link.
- Open Navisworks
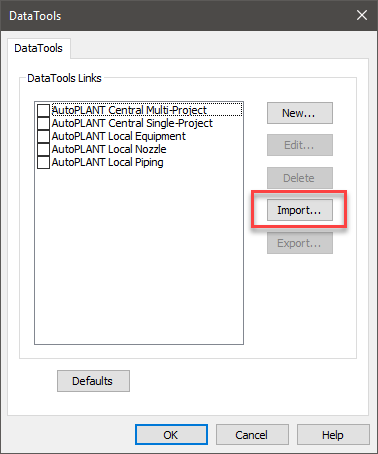
- Click on Home > Data Tools
- Click on Import.
- Select Waveform Task NW Datatools.xml from the provided package.
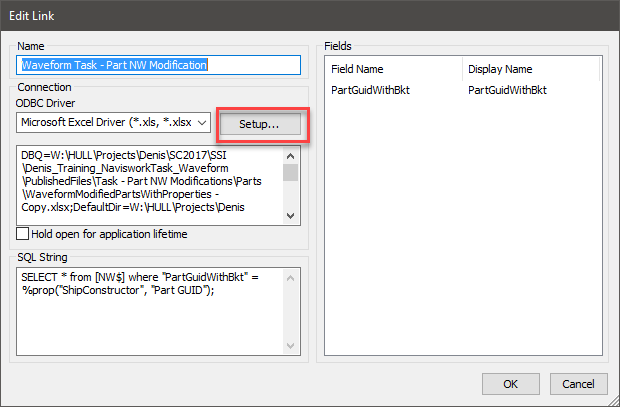
- In the Datatools window select Waveform Task – Part NW Modificaiton and click Edit…
- Click Setup…
- Click Select Workbook…
- Choose the Excel file xlsx generated by PublisherLT
- This was determined by the folder you selected in PublisherLT to generate you files to.
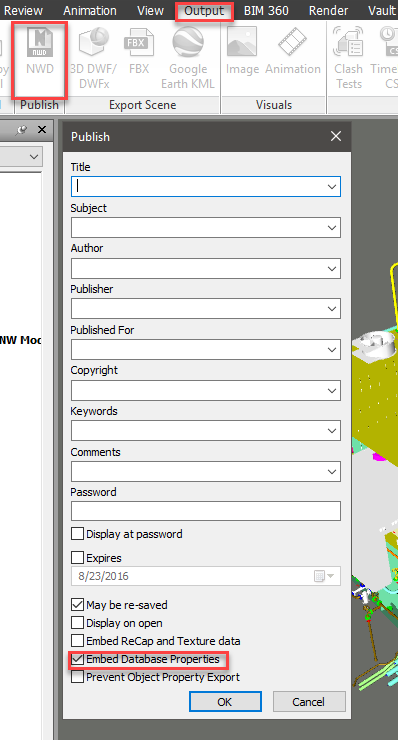
Recommendation
After opening the generated nwf file, export to NWD for better performance. By doing this step you also allow anyone with Navisworks Freedom to be able to use the Navisworks Model.
How-To Video
If you cannot view the YouTube video, click here to access it via SSI Nexus.
Package
Download the package here