Commercial extents delineate the minimum bounding box for a particular part. Commercial extents calculations are required by several companies for various reasons including ordering material as well as invoicing towards a specific job. In this post I will demonstrate how to calculate commercial extents for your entire project as well as generate a report which anyone, even non engineers, can execute.
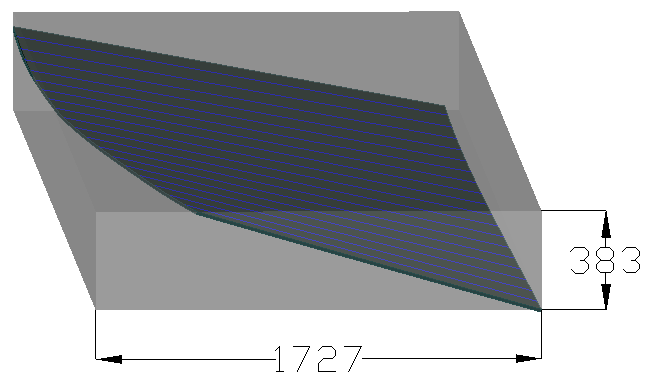
3D Extents of a part
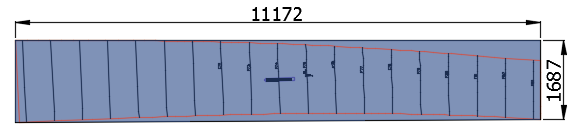
2D Minimum Extents (Commercial Extents) of the same part
ShipConstructor calculates commercial extents with the command SCADVSAVEMINEXTENTSSTRUCTURE which is also available via the Advantage Pack Ribbon Tab . This feature can only be called in plate nest drawings because it is using the same algorithm to calculate the minimum bounding box as the automatic nesting algorithm. This does mean only parts that exist in a nest will have their minimum extents calculated. If you require calculating the commercial extents before you start nesting you would need to create a temporary nest drawing and insert all parts into that nest drawing. This is shown in a video created by Marintech:
The best workflow to calculate commercial extents as well as to generate a report for your entire project is to use PublisherLT. You would be able to use a workflow that did not leverage PublisherLT; however, it would be much more manual and require orders of magnitude more effort. With using PublisherLT I can generate and calculate commercial extents for all the parts which are nested in less than 3 minutes of effort. This will require an initial 5 minute setup time.
I will go over the steps required to:
- Set up your project and PublisherLT. This is only required to be done once and will take approximately 5 minutes.
- Run PublisherLT to calculate the commercial extents and then generate a report. This will take approximately 3 min and can be automated or scripted if required.
Setting up your Project (only required once)
The only thing we need to do to setup your project is to create a Bill Of Material (BOM) which contains the attributes you want to report on. To simplify this method you can use a BOM that I have included in the supporting package section listed below.
To import the BOM
- Open Manager
- Select File > Import > All Modules
- Select file SSI Waveform Part Commercial.xml included in the supporting package
To review or modify the properties you would like to report:
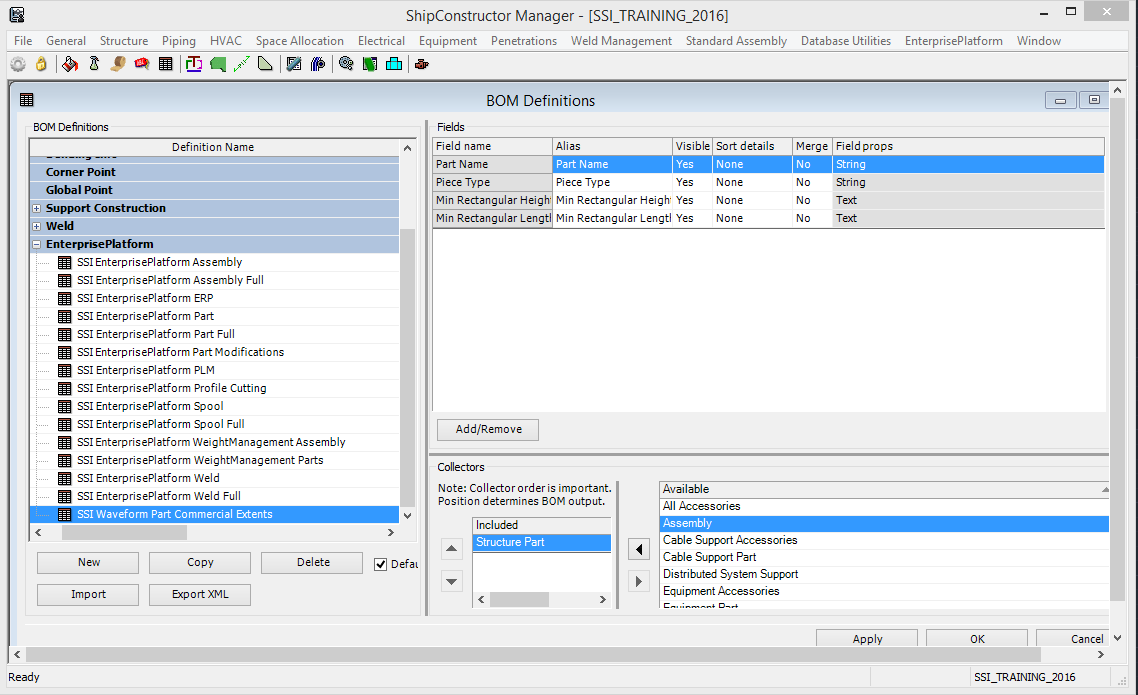
- In Manager select General > Production Output > Bill of Materials
- Expand EnterprisePlatform in the BOM Definitions and select SSI Waveform Part Commercial Extents.xml
- Click the Add/Remove button in the Fields section to add more properties
Set up PublisherLT (only required once)
For PublisherLT we will need to add two operations.
The first operation will be to calculate the commercial extents for all parts in a nest drawing and store the value in Min Rectangular Height and Min Rectangular Length.
Steps
- Open and edit “C:\Users\USERNAME\AppData\Roaming\SSI\EnterprisePlatform 2016\Operations.xml”
- Copy & paste below operation between <dwgoperations> </dwgoperations>
<operation id="Waveform_CalculateMinExtents"  connected="true">
  <define name="DWGType">$^{scon.dwg.type}</define>
  <case property="DWGType">
    <when value="PlateNestDrawing">
      <acad postexecutiondelayinmsec="1500">SCADVSAVEMINEXTENTSSTRUCTURE</acad>
    </when>
  </case>
</operation>
The second operation will be to generate a report using the Bill Of Material we imported in the previous step.
Steps
- Copy & paste the operation below between <generalgroupoperations> </generalgroupoperations>
<operation id="Waveform Commercial Extents" appliesto="parts">
  <define name="PartProperties">
    <pathcombine>
      <property name="rootdir"/>
      <string>Commercial Extents</string>
    </pathcombine>
  </define>
  <makedir>${PartProperties}</makedir>
  <scon timeoutinsec="300">EPEXPORTPARTPROPERTIES ${list.ids} "SSI Waveform Part Commercial Extents" "" "{PRIMARY}" "${PartProperties}" "CommercialExtents.tsv"</scon>
</operation>
This completes the setup.
Calculating and Reporting Commercial Extents
The steps below are what is required every time you want to ensure all parts have the correct commercial extents. First you need to select all the plate nest drawings and call operation “Waveform_CalculateMinExtents“. This step will calculate and update all parts’ commercial extents. As mentioned above, only the parts in the nest drawings selected will be updated. For all parts which are not nested, their values will not be calculated. Secondly you need to select all structure parts and then assign the operation “Waveform Commercial Extents” to generate the report.
In the workflow below I am using a specially created xml which will load all nest drawings and structural parts in the project to simplify the process. I am also using an additional xml which will assign the appropriate operation to the items loaded. This is to streamline the process as well as to be used to automate the process if required.
Both XML’s are included in the supported package.
Workflow
- Open PublisherLT
- Select your project
- Select “Change Output Directory”
- Choose a folder where you want the report to be generated
- Click on “Load Manager”
- Select “Load Criteria XML”
- Select xml which is contained in the package
- Click “Open”
- Click on Import in PublisherLT main window
- Select xml which is contained in the package
- Click Open
- Click Run
Important Note:
Since PublisherLT cannot guarantee which operation runs first, I would suggest first unselecting all the parts keeping the drawings (nest drawings selected) and click “Run”. When completed I would then select all parts and unselect all drawings. In the video I ran both at the same time which may work but is not guaranteed to work because the operations may be executed in different order depending on the version of the PublisherLT you are using. Better safe than sorry.
Video
If you do not have YouTube you can download the video here.
Supporting Package
Download all reference material here.
Post Comments
I have had some people ask about using this workflow with an older version of ShipConstructor. If you are trying to use this with ShipConstructor 2015 R2 you will have to do some more manual work as we have added many new features to automate several repetitive tasks.
First you will need to create a BOM in ShipConstrurctor with the name of “SSI Waveform Part Commercial Extents” and add the fields you want in your report. I will not go into detail how to do this as it is the same workflow to create any BOM in ShipConstructor.
In PublisherLT you will have to:
1. Open Load Manager (to load all the nest drawings)
2. Select Drawings
3. Select Types
4. Select Plate Nest
5. Optional (click Export) This is to save the selection so you do not need to go through this process next time
6.Click OK
7.With the Drawing category highlighted select Operations > Select
8. Select the operation Waveform_CalculateMinExtents for all nest drawing.
9. Click Run
When Complete clear all items in PublisherLT
1. Open Load Manager ( load all the parts and filter only the structural part types that can be plate nested)
2. Select Parts
3. Select Types
4. Corrugated Plate
5.Curved Plate
6. Faceplate
7. Flatbar Stiffener
8. Flatbar Twisted Stiffener
9. Plate
10. Optional (click Export) This is to save the selection so you do not need to go through this process next time
11. Click OK
12. With the drawing category highlighted select Operations > Select
13. Select operation Waveform Commercial Extents
14. Click Run
Note during the selecting the part and drawing types in Load Manager you can export your selection (the steps above are optional). This export can then be imported using Load Manager > Load Criteria XML. This is similar to what I did in my blog post but the XML schema is tied to your project in older versions of ShipConstructor which is why I cannot create this XML for you. However, if you are going to run this often you will want to export the XML so you can use import in the future.Or the best way would be to update ShipConstructor :).