
The ability to combine several pieces of data from multiple sources and represent it in a visual fashion can significantly improve how we transform data into actionable information. In today’s environment we use many different systems from 3D CAD models, information systems, legacy in-house applications and even the common denominator every company uses, Excel.
In this blog post I will demonstrate how you can connect and link an intelligent light weight 3D model (Navisworks) with information stored in Excel.
I chose Excel because it is still very common for shipyards to have processes which require information to be stored and maintained in Excel. By linking the information stored in these files with the 3D Model we can allow people to better see trends, issues or just conceptualize information.
How-To Video
If you are not able to view YouTube videos you can view the video on SSI Nexus here.
High Level Overview
There are two requirements to be able to support this workflow. The first is a Navisworks model of your ShipConstructor project. I have several blogs about creating a Navisworks model from ShipConstructor:
- Automate Generation of Multiple Navisworks Models
- PublisherLT: Create a Clean Navisworks Model
- PublisherLT: Create an Associative Navisworks Model
The second requirement will be an Excel file that has the information you want to link and display in Navisworks. This may require some additional setup since to link an Excel file to Navisworks it requires the column headers to be the first row in a worksheet. The easiest way to do this is to create a temporary Excel worksheet (tab) that simply references the information from the source sheet(s). This is demonstrated in the video.
Create a Link to an Excel file
The first step will be to create a link to the Excel file. This is using an OBDC Excel driver that is built in to Navisworks. Do not worry if you do not know what OBDC is. This link just creates a relationship to the Excel file and not a specific sheet (tab) inside the file. This link will remember the path to the Excel file so if the Excel file is updated the new information will automatically display in Navisworks once you restart Navisworks.
Create a Relationship between Navisworks and Excel Sheet
We will use Navisworks DataTools features to display the information in Navisworks. When configuring the DataTools connection you will have to specify the Excel Sheet (tab) which contains the information you want to display as well as build the relationship between the Excel file and the Navisworks model.
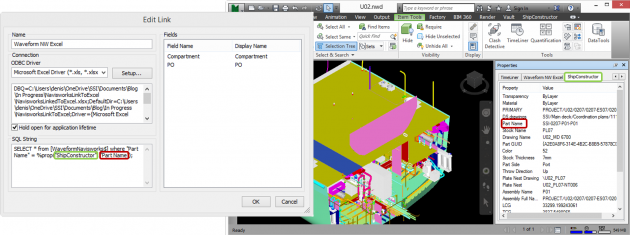
Specify the Properties to Display in Navisworks
You will be able to choose what information is displayed in Navisworks. This is a necessity since most of the Excel files you will reference will have much more information than what you want to display.
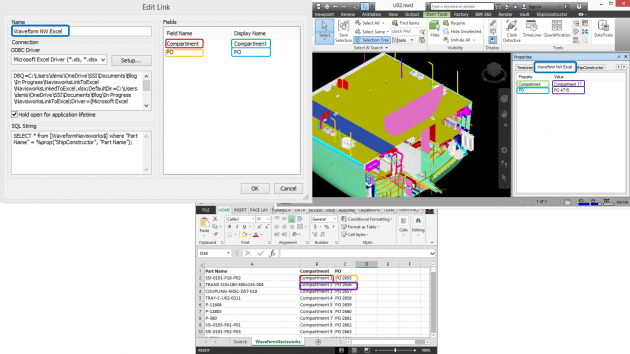
Step By Step Instructions

1. Open the Navisworks Model (U02.NWD) attached to post
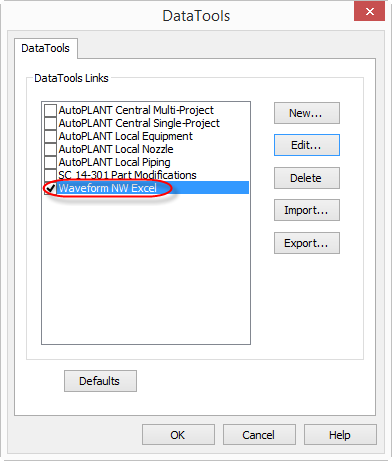
2. Open DataTools on the Home Tab
3. Click New..
4. Enter the name: Waveform NW Excel
This name will be used for the Navisworks Ribbon name
5. Click Setup..
6. Click Select Workbook..
7. Choose the Excel file (NavisworksLinkedToExcel.xlsx) attached to the post
8. Click OK
9. In SQL String enter the string
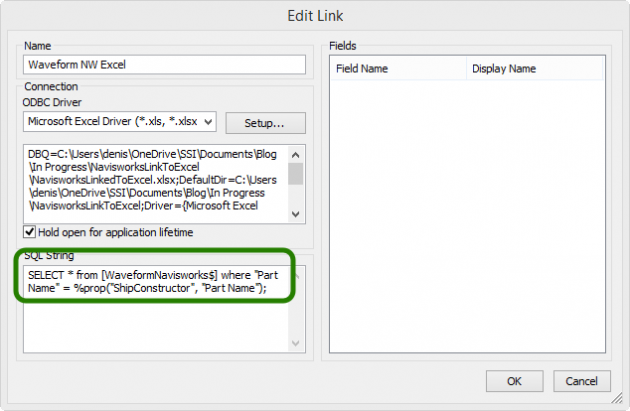
SELECT*from[WaveformNavisworks$]where"PartName"=%prop("ShipConstructor","PartName");
| Reference Information:
SELECT*from[SHEETNAME$]where"EXCELPROPERTY"=%prop("ShipConstructor","SHIPCONSTRUCTORPROPERTY");
SHEETNAME – Replace with the name of the Excel Worksheet (Tab) you are going to use EXCELPROPETY – The name of the Excel column in the worksheet you selected which will be the linking key between your Excel and the ShipConstructor model. Ideally this would be a GUID but can be an item name (part name, weld name, etc.) SHIPCONSTRUCTORPROPERTY – The name of the ShipConstructor property in Navisworks you are linking to the EXCELPROPERTY. |
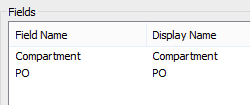
10.Enter the Field names and Display Names we want to display from the Excel sheet.
| Reference Information:
Field Name – Name of the column in the Excel file Display Name – Name you want to display in the Navisworks property window. |
11. Click OK
12. Make sure Waveform NW Excel is selected
13. Click OK
14. Click parts in the Navisworks Model and see the properties displayed in the Waveform NW Excel property tab
Attached Files
You can access the files here

Post Comments
Hi,
It is not possible to download the sample files.
Xavi.
You need a free SSI Nexus account. You can get instant access (~15min) to SSI Nexus after you register here: http://hs.ssi-corporate.com/support/nexus
Error
Unable to set one or more links to active due to insufficient/invalid information. Setting then to inactive
Please review the following Knowledge Base article on SSI Nexus that outlines updates to the procedure here, including how to utilize SSI ShipExplorer, a Navisworks plug-in that provides a seamless connection to your ShipConstructor project, as well as patch updates for Office 365 Virtualized environments:
https://ssicloud.sharepoint.com/sites/nexus/kb/Lists/Posts/Post.aspx?List=99638a30%2D0390%2D400d%2Dbdf7%2D1de1c96d4799&ID=420&Source=https%3A%2F%2Fssicloud%2Esharepoint%2Ecom%2Fsites%2Fnexus%2Fkb%2FLists%2FPosts%2FAllPosts%2Easpx&Web=47f5fc08%2Dcaee%2D4583%2Db310%2D0ed422ad3cfd